Hidden
Hidden
Hidden
Hidden
Hidden
Hidden
Hidden
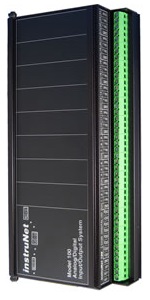
LINEAR OR RADIAL POTENTIOMETER MEASUREMENT (0 TO 1) The following instruNet hardware supports Potentiometer position Measurements:
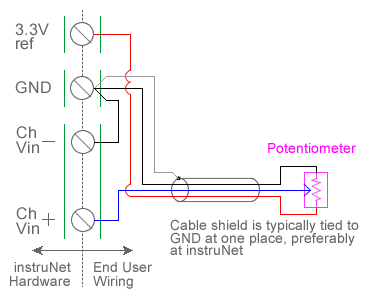
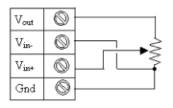
A potentiometer (pot) is an external device that measures linear distance or rotation angle. instruNet connects directly to pots by providing an excitation voltage across the pot, measuring the voltage at the center position, and then returning a value between 0.0 and 1.0. For example, if one sets a 270 degree pot to 27 degrees, instruNet would return 0.1. One can scale this 0 to 1 value to other units using the Channel Mapping dialog. We recommend 5K to 25K ohm pots since lower values may overload the excitation voltage and higher values may incur excess noise. When one selects Potentiometer in the Sensor field, an interview leads the user through the setting up of the device. One enters parameters such as pot maximum resistance (ohms). The excitation voltage for the pot is supplied either by instruNet or by an external voltage source. instruNet calculates the pot position using the equation: PotPosition (0 to 1) = ((Vin+ - Vin-) - Vinit) / Vout Vinit (Voltage measured in Counter-Clockwise (CCW) position, used for calibration) and Vout are fixed values that are specified by the user in the Constants Settings area (indirectly if set via the interview), whereas (Vin+ - Vin-) are measured in realtime by instruNet. To do a Potentiometer measurement, you must wire your sensor per the above diagram and then set up your software via the Interview process (started after selecting sensor type in Channel Setup dialog) or by manually running through the below steps: 1. Set the Sensor field in the Hardware settings area to Potentiometer. 2. Set the Measurement Range in the Hardware settings area. For details, click here. 3. Set the Ro field in the Constants settings area to the value of the potentiometer maximum resistance, in ohms units. Devices between 5K and 25KΩ are recommended. 4. If working with hardware that has variable internal excitation (e.g. i100 ± 5V), then set the Vout field in the Constants settings area to the desired excitation voltage 2, 11. Alternatively, if applying an external excitation voltage, enter -Ro value in the Ro edit field (e.g. -10000 instead of 10000 ohms) to tell the software that the excitation is external, and then enter the external excitation voltage in the Vout field. 5. Set the Vinit field in the Constants settings area to the voltage measured when the pot is in the Counter-Clockwise (CCW) position, in Volts units. 8 6. Set the Wiring field in the Hardware settings area to Bridge. 7. Wire your potentiometer per the above figure. Click here if you need more guidance setting up the software, and click here if the measured value is not correct. 5, 10
|