Overview This page discusses the measuring of a ¼ Bridge strain gage using the instruNet measuring system. It discusses wiring issues involved in getting microVolt accuracy's with a gage 30meters from the instruNet measuring unit, and analyzes the various component errors, and their magnitudes.
Please refer to Strain Gage Setup
for details involving the setting up of a strain gage measurement.
For more information on excitation, see 10V External vs. 3.3V Internal.
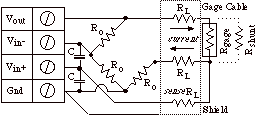
Hardware Setup In this study, we wired a 350Ω gage (GF = 2.155) as shown below, with a 30 meter cable between the gage and the instruNet measuring unit. Each wire in the cable was measured with a DVM at 3.8 ohms (R L), and the foil shield of the cable was tied to ground in one place, at the instruNet GND terminal.
Since we are working with the i100 (not with the i420/i430/i60x
12), we added two 0.1uF capacitors to create a 4KHz low pass filter [Fc = 4000Hz = 1/(6.28 * R * C) = 1/(6.28 * 350ohms * .1e-6Farads)] to attenuate RFI energy that couples into the system. Without this filter, RFI energy can easily add several hundred µStrain of offset errors and noise. These capacitors, close to the instruNet terminals, are necessary in order to achieve microVolt accuracy's with a long gage cable (e.g. > 3meters) with the i100. These capacitors are NOT recommended with the i420/i430/i60x 12.
The bridge completion resistors are 350ohm 1/4Watt devices with a 0.1% initial accuracy and 5ppm/C temperature coefficient.
Strain Gage Wiring Guidelines AM radio stations transmit electromagnetic waves though the air
that oscillate at approximately 500KHz. These can induce many milliVolts
of energy into a small loop of wire,
and 30mV corresponds to approximately 10,000 μStrain. To reduce
the amount of RFI energy that enters the measurement path, the following wiring practices are recommended:
The cable between the gage and measuring device must be shielded. Braided
shield is better than foil; however, in most cases, foil is adequate.
The cable shield must travel as close to the gage as possible, and as
close to the measurement unit as possible, without shorting.
The cable shield must be tied to ground at one place, preferably at
the instruNet unit GND terminal.
The bridge completion resistors must be as close to the measurement unit as possible.
When working with the i100 (not with the i420/i430/i60x
12), the filter
capacitors must be as close to the measurement unit as possible.
The strain gage wires should be twisted together whenever possible.
In the previous figure, two wires route to the measurement unit from one side of a 3wire gage, one for current and one for sense (i.e. the two lower-most wires in the pictured gage cable).
With the i100 (not with the i420/i430/i60x
12), in some cases, RFI will couple into this loop of wire. The solution is to either attach these two wires together at the instruNet measurement unit to short out the RFI signal, or to install the pictured capacitors, to attenuate the RFI signal before it reaches the instruNet measurement unit.
Software Setup The instruNet software settings are set as follows:
The above settings show a voltage range of ±80mV yet in many cases, a smaller voltage range such as ±10mV is adequate. If you increase the amount of strain on your gage and bump into a maximum returned value, then consider increasing the voltage range (e.g. move from ±10mV to ±20mV ) .
i100 Low Pass Filters With the i100 (not with the i420/i430/i60x
12), a low pass filter consisting of two capacitors, labeled "C" in the previous diagram, is often used to attenuate RFI that is not stopped with the previously mentioned Wiring Guidelines. One capacitor is positioned between the GND and Vin- instruNet screw terminals, and the other is positioned between the Vin+ and Vin- screw terminals, at the instruNet box. The capacitors are strongly recommended with the i100, since even a small loop of wire in the measurement path will pick up some RFI. The cutoff frequency of the low pass filter is a function of the capacitor value, as shown in the following table. If you are not interested in signals greater than 1KHz, then 0.1uF is recommended; otherwise, you'll need a smaller capacitor and a larger cutoff frequency.
Grounds and Power Supply Wiring
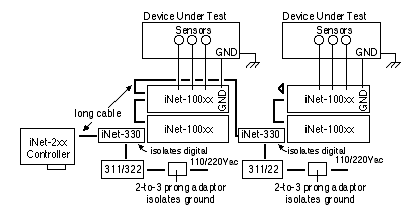
If multiple instruNet units are connected together, with multiple power sources,
then ground loops can develop. This involves
currents that pass through the measurement circuit, on their way to earth ground, from the various power sources in the
region. And these currents can induce voltage offsets. And these might be large compared to the microVolts accuracy's we
are looking for. The best, and lowest risk solution is to isolate the instruNet measurement system with the
#iNet-330 Optical Isolators, as noted here, and illustrated below:
Balancing the Bridge
For details on how to balance (i.e. one point zero calibration) load cell and strain gage sensors, click
here.
Strain Vs. microStrain
If one sets the Mapping Scale field to 1.0e6, then instruNet returns μStain units; otherwise, if Scale is set to
1.0, instruNet returns Strain units.
Verifying that RFI is not inducing Noise or an Offset Error To verify that RFI (i.e. Radio Frequency Interference) is not inducing noise or an offset error, one can move the gage cable and watch the effect this has on the measured µStrain value. This value should not vary by more than ±10 µStrain as cables are moved about. If it does, it is recommended that you follow the Wiring Guidelines more closely, optically isolate your instrumentation and/or add more capacitance across your voltage measurement input terminals if working with hardware that does not pump current when channels switch (e.g. external capacitors are not recommended with i420/i430/i60x).
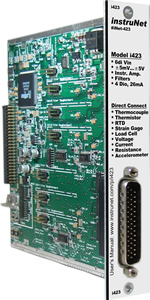
Also, one can consider using hardware such as the i423, which has
extensive internal RFI filter and analog low pass filter capabilities.
To simulate an electrically hostile environment, move the gage cable into a computer and wrap it around a video board. This can be done while the gage is at 0 µStrain, or when it is connected to R_shunt. Any loop of wire in the voltage measurement path (i.e. from Vin+, to the gage, and back to Vin-) is a directional antenna. RFI energy that passes through the loop induces a voltage, which can then be seen as an offset or as noise. Moving the cables around changes the RFI fields that enter the loop, and therefore changes what is viewed on the computer. The two capacitors close to the instruNet screw terminals attenuate most of this effect. Without these capacitors on the i100 (not with the i420/i430/i60x 12), one can typically see hundreds of µStrain of effect from moving the cables, even with only a 10cm diameter loop of exposed wire. Notice that loops are most prevalent at the gage, and at the bridge completion resistors; therefore, careful wiring at these positions, as noted earlier, is important.
Verifying that the Measured Value is Correct To verify the accuracy of the system, we attach a shunt resistor (R shunt) in parallel with the gage, near the gage (not 3.8 ohms away at the instruNet screw terminals), to change its resistance (to simulate a bend), and look for a specific µStrain value on the computer screen. In our study, we calculated that if our gage resistance decreased 3.017 ohms, then the measured strain would decrease 4000 µStrain, and a 40,252 ohm Rshunt in parallel with a 350 ohm Rgage facilitates this 3.017 ohm change (R_lead = 3.8, GF = 2.155). In our study, we measured 4001.7 µStrain via the computer, with about ±1.0 uStrain of noise with 0.064sec integration and ±5.0 uStrain of noise with 0.001sec integration.
An Analysis of Measurement Errors There are several sources of errors which we will explore in detail. Errors are characterized as Temperature Drift, General Measurement Errors and Noise.
There are 4 sources of Temperature Drift (errors caused by a change in temperature):
1a. Ro Temperature Drift If one Ro resistor (i.e. a bridge resistor) drifts 5ppm/C max, and the temperature changes 6C after balancing the bridge, then the Ro will drift 30ppm maximum, which will cause (Vin+ - Vin-) to change 40uV max, which corresponds to 15 µStrain (GF=2, Vexc=5V, ¼ Bridge bending). Three resistors could cause more drift in the measured µStrain, especially if their actual temperature coefficients were different. To see this, note the change in µStrain on the computer screen before and after one Ro is heated with 2 warm human fingers. The µStrain reading while the fingers are on the resistor will not be accurate since the fingers change the resistance (yet it is accurate before and after the fingers). Typically, one will see a 5 µStrain variation when one Ro is heated several degrees.
1b. Rgage Temperature Drift This situation is similar to the Ro scenario, described above. The strain gage resistance changes with temperature to induce an error. One can see this by heating the gage, and noticing the effect on the measured strain. Typically, a heat gun on the gage for 4 seconds can induce a 200 µStrain change. Obviously, this heat can change the strain of the material as well. Please consult the strain gage package label for more information on temperature effects.
1c. instruNet Temperature Drift instruNet hardware induces a small temperature based offset error since the last instruNet auto-calibration.
This is typically 0.3 to 2.0uV/C depending on hardware product and measurement range. For example, if we feed 0.000uV into instruNet (e.g. shorts together Vin+, Vin- and GND with small wire),
software auto-calibrate instruNet when its hardware is at 30°C, measure 0.0 ± 2.0 μVolts, heat up the instruNet hardware to 35°C and
look at the computer screen; we might see something like 5.0 ± 2.0 μV.
In typical cases, auto-calibration is run every 5 minutes in the background (even while digitizing) to null this error to 0uV. 10uV corresponds to about 4uStrain with a ¼ Bridge bending configuration with GF of 2 and Vexc of 5V. To see this, press the instruNet Calibrate button, change the instruNet hardware temperature 5C with a heat gun, press the Calibrate button again, and note the change in measured µStrain change right after the second button press. This change (e.g. 4uStrain after a 5C change) is the amount of correction that occurred when the instruNet unit calibrated the 2nd time and corrected for the internal Voltage measurement temperature drift.
1d. Material being measured Temperature Drift If the temperature of the material being measured for strain changes after balancing the bridge, it will expand or contract, causing the strain to change. This is difficult to measure, since it is often difficult to heat the material without heating the gage itself, yet if one characterizes a specific gage for temperature before attaching it to the material, and then corrects for this after being affixed to the material and heated, then one can get a fix on the strain temperature drift of the material itself.
There are several sources of General Measurement errors:
2a. Rshunt Verification Resistor Accuracy If you swap in an Rshunt verification resistor instead of the strain gage, for calibration purposes, and the calibration resistor is different from what you think it is, then that will induce an error. Measuring the verification resistor with a ≥ 6.5 digit dvm is helpful.
2b. instruNet Voltage Measurement Error The typical instruNet system provides approximately ±10uV of absolute accuracy (e.g. approx ±3uStrain with GF=2, 5Vexc, ¼ Bridge bending)
on the ±10mV range and approximately ±20uV of absolute accuracy on the the ±80mV range. This varies depending on the hardware in use, voltage range, integration (seconds), and analog low pass filter setting. Also, this assumes that the instruNet device temperature has not changed much (e.g. ≤ 2°C) since the last time it did its auto-calibration.
2c. Strain Gage Errors Please see your strain gage data sheet for information on GF and related accuracy's. For example, if the initial GF is accurate to 0.5%, then this error would yield a 20uStrain error at 4000uStrain.
There are several sources of Noise errors:
3a. instruNet Measurement Noise This is noise within the instruNet measuring device itself. To measure this noise, attach Vin+ and Vin- to instruNet GND, and digitize. You should see one number come back (0.0 Volts), yet if you digitize 100 points, they will not all be the same. The amount of variation is the internal noise within instruNet. The noise figure is often described as Volts-Peak-To-Peak, or Volts-Root-Mean-Square, and is a function of the Voltage Range and Integration fields. Typical noise levels with 0.016secs of integration on a ±10mV range are 0.8uVrms (0.3uStrain RMS) or ±3uVpp (±1uStrain peak-to-peak with GF=2, Vexc=5, ¼ Bridge bending). For details, see Sample Rate Vs Integration Vs. Noise
3b. Noise from RFI Radio Frequency Interference (RFI) can very easily be picked up by the strain gage, the gage cable, and the bridge wires; and this additional energy sometimes appears as a random signal, or sometimes as a fixed offset error. AM radio produces strong signals beginning at 500KHz, and a 50KWatt transmitter 10KM away can induce a 50mV signal in a 1meter diameter loop of wire. This high frequency signal can produce fixed offset errors on the order of ten's of milliVolts within the instruNet measurement unit. And this is when we're trying to get microVolt accuracy's! And one radio station is just one of many sources of RFI -- all sources (e.g. radio, TV, cellular phones, etc) add up to beat up on your measurement.
The best way to kill RFI with the i100 (not with the i420/i430/i60x
12) is to place capacitors at the instruNet input terminals.
The capacitor lets low frequencies pass, and stops high frequencies. For information on low pass filters and capacitors,
please see Low Pass Filters. For information on how to diagnose and fix an RFI problem, please
see Verifying that RFI is not inducing noise or an offset. In summaryk,
two 0.1uF capacitors are strongly recommended with the i100 if the signal you are measuring is <1KHz
and the measured reading is not accurate or moves when instruNet-to-gage cables are moved.
3c. Noise from AC Power Lines Noise from AC power lines is easily attenuated with the instruNet integration feature. If instruNet measures the voltage at the bridge for an even number of power cycles (e.g. 16.666e-3 or 66.666e-3 seconds for 60Hz power), then the effects of the positive and negative parts of the power line sine wave cycle will cancel.
3d. High Frequecies between grounds For details, click here.
Maximizing microVolt per microStrain ratio The number of microVolts measured per unit of microatrain relates to measurement accuracy. One wants a large number, if possible, and this is achieved with a large Vexcitation, and a large GF.
The number of uV per unit of μStrain with a ¼ Bridge in Bending configuration is summarized as uV/µStrain = Vexcitation * GF / 4. For example, 5Volts of excitation and a GF of 2 correspond to 2.4uV per µStrain. Below are several ¼ Bridge Bending configurations:
Summary Good shielding, good ground wiring, capacitors at the i100 instruNet screw terminals to kill RFI, verification via an R shunt resistor, and verification that RFI energy is not effecting your measurement (by moving cables and watching the effect on the computer screen) will all insure that you have a positive measurement experience.